
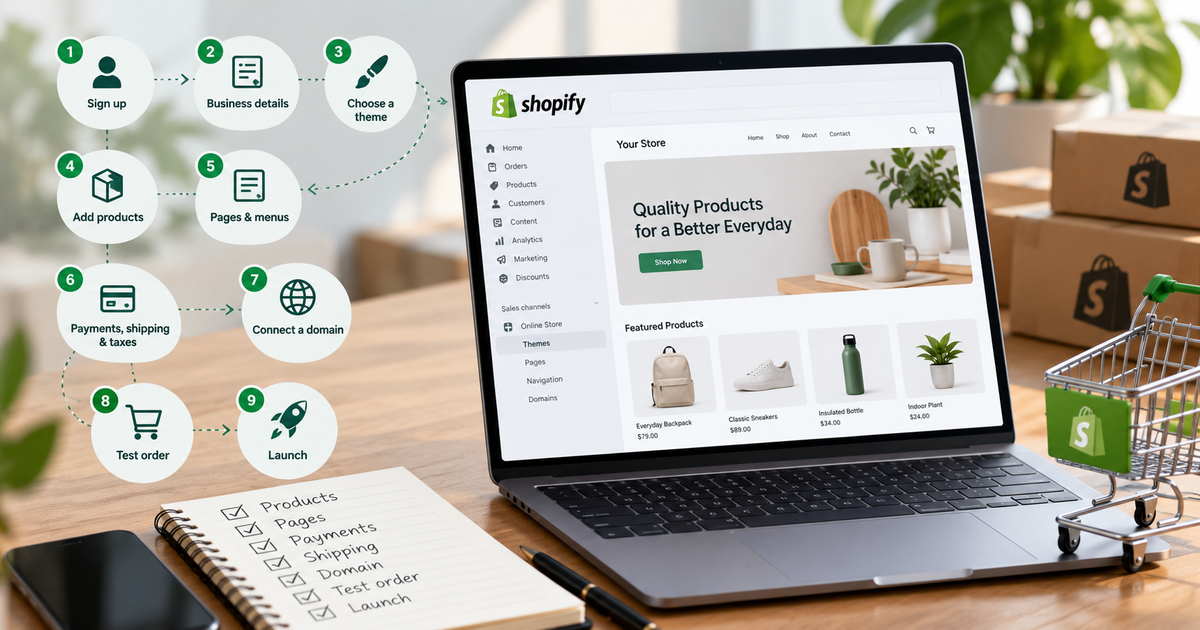
You can set up a Shopify store in nine steps: sign up, add your business details, choose a theme, add products, build your pages and menus, set up payments, shipping and taxes, connect a domain, place a test order, and launch. Shopify's own launch guide says only three things are required before you can open to the public: a subscription plan, a store address, and a payment method with test mode turned off. Everything else makes the store better, but it will not stop you from launching.
This guide walks through the steps in the order most people do them. It marks what is required, what can wait, and where people tend to get stuck.
Key takeaways
- Setting up a Shopify store takes nine steps: sign up, add business details, pick a theme, add products, build pages and navigation, set up payments, shipping and taxes, connect a domain, place a test order, then launch.
- Shopify's own launch guide lists only three requirements: a plan, a store address, and a payment method with test mode turned off.
- Place at least one test order before launch, and again whenever you change payment settings.
- The store stays private behind a password page until you switch access to public.
- Doing it yourself costs time. Handing it off costs money. The right choice depends on how many products you have and how much time you can spare.
Before you start: what to have ready
Setup goes faster when the material is ready before you open the admin. Gather these first:
- Your logo, brand colors and fonts, if you have them
- Photos of every product, ideally in the same size and style
- Product names, descriptions, prices and, if you track stock, quantities
- Your business name and address (Shopify asks for a store address before launch)
- Text for your About and Contact pages
- Your shipping rates or rules, and the places you ship to
- A domain name, if you already own one
Product photos and descriptions are usually what holds a launch up, not the Shopify settings. If you have 30 products, that is 30 sets of images and text.
Step 1: Sign up for Shopify
Go to Shopify's site and start the free trial. According to the Help Center, you need an email address and password, or you can sign up with a Google, Apple or Facebook account. Billing information and the setup questionnaire are both optional at this stage. Skipping billing means you can add it later, though you will need a plan before the store goes live.
You do not need to settle on the perfect store name on day one. TechRepublic's setup guide points out that the name can be changed later.
Step 2: Add your business details
Open Settings and fill in the business details: store name, contact email, and address. The address matters because Shopify lists a store address under Settings > General > Business details as one of the required launch steps. Do this early so it does not block you at the end.
Step 3: Choose and customize a theme
The theme controls how the store looks. Start with a simple one you can edit without code, then adjust the colors, fonts, logo and homepage sections to match your brand. A clean theme with good photos does more for a new store than a complicated one with many effects.
Keep the homepage short. A clear headline, a few featured products or collections, and a way to contact you are enough for a first version.
Step 4: Add your products
Add each product with a title, description, price and photos. The Help Center notes that adding more products follows the same steps as adding your first. Then group them into collections, such as by type, season or sale status, so customers can browse.
A few habits save time later:
- Write descriptions for the buyer, not for search engines. Say what the product is, who it is for and what is included.
- Use the same photo size across products so the grid looks even.
- Add products in a batch, then review them together on the live preview instead of one by one.
If you have a long catalog, Shopify supports importing products from a spreadsheet, which can be faster than typing each one in.
Step 5: Build your pages and navigation
Pages are permanent information pages such as About and Contact. The Help Center notes that pages do not appear in menus on their own, so you also need to add them to your navigation. The main menu links to Home and Catalog by default, and you can add collections and pages from there.
Most stores also publish shipping, returns and privacy policy pages. Shopify's launch guide does not list these as launch requirements, but customers look for them, and the rules for your business depend on where you operate. Check with a local advisor about what you need.
Step 6: Set up payments, shipping and taxes
Payments. A working payment method is one of the three required launch steps, and test mode must be off before you accept real orders. Shopify Payments is the built-in option in supported countries. TechRepublic notes that third-party gateways can add extra transaction fees on top, so compare the cost before you choose.
Shipping. Decide where you ship and how much you charge. Options include flat rates, free shipping above an order total, and local delivery or pickup. Set these before the test order, so the test shows the real checkout.
Taxes. The test order is also where you check taxes. Rules vary by location, so confirm what applies to your business with an accountant or tax advisor rather than guessing.
Step 7: Connect a domain
Every store starts with a Shopify-provided address. A custom domain looks more professional and is easier to remember. You can buy one, connect one you already own, or transfer one in. A custom domain is not on Shopify's list of required launch steps, so it can wait if everything else is ready, but most stores add one before sending real customers.
Step 8: Place a test order
Do not skip this. Shopify's launch guide says a test order checks checkout, order processing, inventory, shipping and taxes. You can turn on Shopify Payments test mode, or use a test gateway or a real provider and cancel and refund the order right away. The guide recommends placing at least one test order during setup, and again whenever you change payment settings.
While you test, use the Preview store option under Online Store to see the storefront the way customers will. Check it on a phone, since many shoppers will open it there.
Step 9: Choose a plan and launch
New stores are private until you open them. Shopify lets you set an optional password page that shows visitors a message while you finish. When you are ready, complete the three required launch steps:
- Select a subscription plan. Check Shopify's pricing page for current plans and fees, because they change.
- Add your store address under Settings > General > Business details.
- Set up a payment method with test mode deactivated.
Then switch the store from private to public. Shopify offers a few places to do this, including the Online Store access menu, the Preferences page and a launch card on the Home page.
Mistakes that slow people down
- Leaving test mode on. If test mode is still active, you cannot accept real payments. Check it right before launch.
- Waiting on photos and text. The settings take less time than writing product pages. Start the content early.
- Forgetting the menus. A page that exists but is not in the navigation will not be found.
- Testing only once. Place a fresh test order after any payment change.
- Treating every optional step as required. If something is not on the three-item launch list, it can follow after you open.
DIY or hand it off?
Doing it yourself makes sense when you have a small catalog, time to learn the admin, and no hard launch date. Handing it off makes sense when you have many products, a deadline, or no wish to learn the theme and settings. Neither choice is wrong. The honest comparison is your time against what a build costs. Our guide to Shopify store setup cost explains what that cost usually covers.
What Shopify store setup includes at Barry's Software
Barry's Software sets up Shopify stores for small businesses. In the package, you provide your logo, branding, colors, pictures, videos and text, and Barry's Software builds the store around them. The package covers up to 30 products, a custom homepage or landing page, product pages and a collections page, with up to 5 design revisions. You can share example sites for the style you want. Installing apps is separate. After launch, Barry's Software helps with bugs and small mistakes.
If you would rather skip the setup work, tell us what you sell and we will build it for you. See the Shopify store setup service, or get a quote.
Not sure whether you need a store, a website or a landing page? Read our guide on Shopify vs website vs landing page.
Get a quoteFrequently asked questions about setting up a Shopify store
How long does it take to set up a Shopify store?
It depends mostly on how many products you have and how ready your photos and text are. The account settings take much less time than writing product pages. The sources I read give no standard build time, so plan around your content, not a fixed number of days.
Is it free to set up a Shopify store?
Shopify offers a free trial, and you can skip billing details while you set up. To launch, you must select a subscription plan. Check Shopify's pricing page for current plans, since prices change.
What do I need before I can launch?
Shopify's launch guide lists three required steps: select a subscription plan, add a store address under Settings, General, Business details, and set up a payment method with test mode deactivated. A test order and a custom domain are strongly advised but are not on that list.
Do I need a custom domain to launch?
No. A domain is not one of Shopify's required launch steps. Most stores add one before sending real customers, because a custom address looks more professional.
How many products do I need to start?
The sources I read do not set a minimum. Start with the products you can photograph and describe well, then add more once the store is live.
Can I set up a Shopify store without coding?
Yes. The steps in this guide use the Shopify admin and the theme editor, which do not require code. Custom changes beyond the theme may need a developer or designer.
Should I set it up myself or hire someone?
Do it yourself if you have a small catalog and time to learn. Hire help if you have many products, a deadline, or want a custom look. Read how to hire a Shopify designer before you choose.